Overall I feel that my animation was a success based on the fact that I have never used 3DS Max prior to this module and really had no concept of what was achieveable in the 3D space at all.
In general I would say the overall quality of the final video production resolution could be a bit better, though this is also due to the limitations of the software.
The .flv version of the file wasn't good enough quality in my opinion so I created a .mov HDTV version which has worked a little more effectively.
On reflection, my idea is possibly a little bit safe. It is quite true to my initial storyboard drawings though the end result maybe isn't quite as visually appealing as other animations.
Though I feel i stuck well to my original ideas. Initially my idea was more expansive though after discussing with my tutor it was potentially a little too extreme for the brief and "biting off a little more than I could chew" for my first 3D animation.
The end result possibly suffered as a result of this in terms of visual aesthetics though it certainly was a lot more manageable, so I take this advice as a positive.
Maybe the first person concept inhibited my overall potential a little, though I feel it offers a different dynamic and take on the subject matter.
The positives that I take forward from the module are that I really like some of the models that I produced. I enjoyed manipulating the camera during the animation phase and I feel that I was able to stick to my initial concept quite well. The fact that I was able to continually reference the themes I had initially chosen and my ideas in the design phase continued through the entire body of work is quite satisfying.
The detail and texture element of the process was something that i immensely enjoyed exploring.
The negatives that I encountered were varied; firstly the main difficulty I found in transforming my paper ideas into visual reality were that some things didn't carry over quite as well as I hoped.
I struggled to make my final scene as effectively as I had planned. I hoped that I would be able to incorporate the final shot of the two bullet holes and the gun into a 007 look, it didn't quite work mechanically. I was a little disappointed I wasn't able to pull this off.
The snake movement in general could be better, really looking at it now the snake should probably continue to move throughout the entire scene, given more time this is something which I would attempt to rectify. Attempting to bone the snake proved quite a difficult movement to achieve. I spent a lot of time on it, yet I am still not entirely satisfied.
Given more time I probably would have introduced a biped for the hand movement, which may have improved the card turn element a little more effectively.
Overall, the final animation possibly could have been a little more realistic visually which might have exposed my potential with the program a little more, yet the overall feel was what I was looking for, so I'm very happy with my results.
Initially I had a few teething issues with editing the audio in Premier Pro, though I think I have succeeded with those difficulties now.
During the actual animating phase I spent a lot of time working to get the camera view right. When I bounced my final version, my rendered version would appear different to the actual camera window. This was rectified by testing a few different formats out while setting up a render. I did have to work on smoothing a lot of the transitions in the edit phase, though I feel that the development and experience with working with the key techniques helped make this more familiar.
In summary, I think my preconception of the animation medium was a bit stereotypical, in that my overall opinion before commencing this module was that everything "animated" had to have a cartoon feel with it. This module has changed that preconception for me. It has really opened my eyes to the potential of different animations and has given me the insight to appreciate on a much wider scale the amount of hard work and detail that goes into computer games and animated movies. It is amazing what can be achieved.
I have thoroughly enjoyed this module, which has completely surprised me in all honesty. Initially I felt that this was beyond me, I spent the first few weeks extremely frustrated, miserable and disheartened. I felt that my efforts were hopeless. So on reflection I am quite pleased with what I have managed to produce in quite a short space of time.
I will now also add the SEO techniques learnt in E-Business to this blog as I am quite proud of it as a body of progressive work. It is nice to gain a further understanding and appreciation of how elements of modules can be combined together towards a final creative package.
Wednesday, 13 April 2011
Final Product
Live and Let Die
Above is the final version of my animation trailer for "Live and Let Die".
Above is the final version of my animation trailer for "Live and Let Die".
(The above video is lower quality in order to upload to blogger)
During the animating of my final piece, I compiled all the movement using the set key and auto key, by selecting all of the individual elements, and bringing them into the camera frame as required. This was all done in the Room Scene Environment in order to achieve the 1st Person Shooter effect.
I made the decision to compile the entire animation within the one environment as I feel it helped me visualise my idea. I extended my time frame to 750 frames which based on 25 frames per second, allowed me to work my final piece to the 30 seconds required for the assignment.
I extended it a bit further and changed the speeds in order to test how it would look visually as an end product.
The hardest technique used while animating was adapting the bullets to enter the scene when required. To achieve this I incorporated use of the visibility track within the dope sheet. This technique allowed the bullets to stay invisible within the scene until they needed to be used and appeared, this was set on a timeline with the controller assigned to on/off. Keys were added to switch it from on to off on the timeline.
Otherwise it was just down to introducing the individual elements in the piece as required using the timeline, then adjusting the framing through the camera view in order to achieve the first person video effect.
When happy with my final efforts, the project was rendered down to a HDTV .flv file and imported into the Adobe Premier Pro software in order to compile and edit it.
Premier Pro:
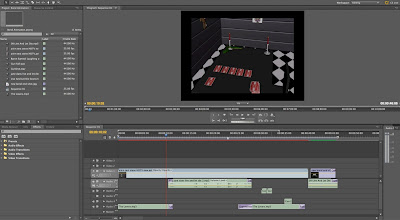
I incorporated a 007 end shot that i created within photoshop to act as the credit detail.
Audio was compiled in Premier Pro also, I imported a few elements of audio from the film:
"The Lovers" theme was sampled as the main score of the animation.
Reference: http://www.youtube.com/watch?v=lmDEJNLkCoc
The "Live and Let Die" theme tune was taken from the James Bond Sountrack album.
(I own this album - but it can be seen as a reference below)
Reference: http://www.amazon.co.uk/Best-Bond-James-Bond-digital-booklet/dp/B001YQNYSY/ref=sr_1_1?ie=UTF8&qid=1302700569&sr=8-1
A gunshot snippet was sampled and also the sound of a gun drop was incorporated.
Reference: http://www.youtube.com/watch?v=LPHbxJo562g
I sampled an actual piece of dialogue from the movie for the card reading element, which was all positioned in palce within the software, fades and levels were modified and here the animation was compiled as a final video.
Reference: http://www.youtube.com/watch?v=b1WT-Imiu3E
It was bounced down as a Final HD .mov and .flv in order to see which was better quality.
Tuesday, 12 April 2011
Model Evaluation / Appraisal
In the Order in which my models were created:
Model 1:
Tarot Cards:
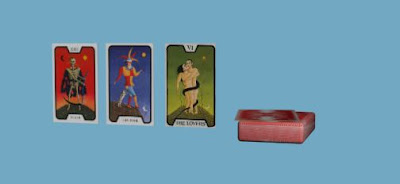
The cards were the first model I had ever created using the 3Ds max software.
Although, they are obviously quite a simple model to look back on now, they were very important in the development of my ideas. I feel for my first model they were a very good place to start.
The cards created an insight into texture and the potential of the medium early on. They were also an important vehicle in the theme of my design, helping to create the underlying mystique/ santeria element of my animation.
Technically quite simple, though this model provided a good platform to learn a couple of techniques early on; multi/sub object material texturing and the use of a chamfer box.
I'm very pleased with how this model turned out. They became a key element of my animation and work well aesthetically.
Model 2:
Walther PPK:
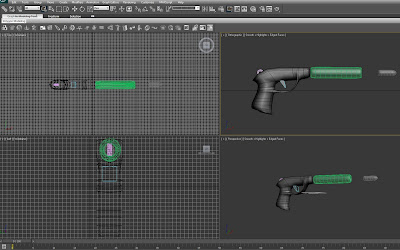
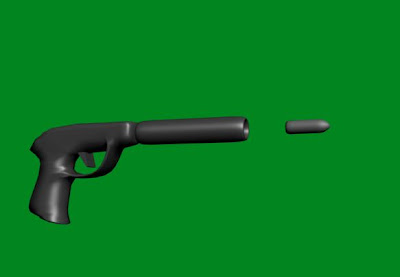
This was quite a challenging model for me to create. Given more time I would still do a lot to improve it.
I do like the smooth style of it, I deliberately attempted to try and keep that element of style while creating the model, somewhat emulating the style of the era and the Bond computer games that I grew up playing.
I spent a lot of time on this model, as initially I over complicated it. I assigned too many segments and had to edit it a lot to eliminate a lot of stretching.
I attempted to add texture to the handle, I just couldn't really get it to look right, when I applied texture it made didn't really work in context with the rest of the model, so eventually I made the decision to abandon the texture at this phase. Perhaps I will develop it further now I have more experience.
I do like how the model works visually, though I admit it could be improved with a little more detail in order to make it more realistic.
This model helped me learn the concept of modelling and allowed me to understand the concept of the space, so I'm quite grateful for that experience progression.
Model 3:
Snake:
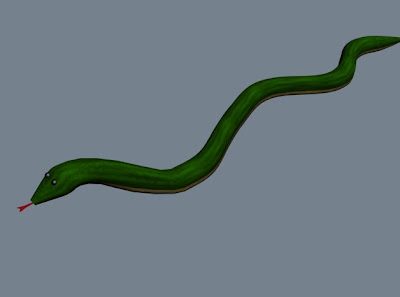
A few techniques were attempted while trying to create the snake element. I really like the use of texture in this model and I think the materials selected are quite effective and realistic, especially the underbelly.
The snake became more of a "theme" item rather then a key object in the animation, I wanted to use it as it is a recurring element from the movie. Initially I had different ideas of how it could be incorporated more effectively, like sticking a knife through the snake on the table etc... Though in the final version I just allowed the snake to travel across the table.
Using bones in the snake was quite a difficult effect to achieve, it took a lot of edits to get it "nearly" right. I don't know if I was working with the bone technique entirely correctly but I persevered. The movement of the snake was changed a lot. It goes to show how difficult a potentially simple animation like the movement of a snake "slither" can be quite complex.
Again I suppose the final result is visually a little cartoon like, which could possibly be improved with further work?
Model 4:
Voodoo Doll:
The Voodoo doll was something that I wanted to create for again for the mystique/ santeria element of the animation.
I have always been interested in the concept of voodoo and it is a prominent theme throughtout the Live and Let Die movie, so I attempted to create that aura. Hopefully it helps for the final decoration and adds some detail to my room scene.
I really like this model, it is possibly my favourite. I compromised a bit of the detail that I would have liked to add, simply because it is a background item rather than a core model.
I think the buttons look great and the texture works quite effectively. I would have liked to have improved the detail in the threading, but could try that in the future.
It's a little bit of a shame that it has become merely decorative. It was a reasonably simple model to produce, again perhaps I have been a little reserved in my modelling, but it is a learning curve and I am quite happy with the success of this model.
I could have potentially made this model a little darker or scarier, maybe he looks a little too friendly. The pins could be made more realistic. I did work on the specular levels, but feel they still could be worked on a tiny more to become more authentic.
Model 5:
Knife:
The knife was the fastest model I made throught this module. It was literally made as a means to attach the doll to the wall. It was simple and served a purpose. I didn't want to spend too much time on it as it was not really going to be seen.
In retrospect I probably could have added more detail to it, though it wasn't necessary for this animation.
Model 6:
Room Scene:
The room scene was created from simply creating a large floor space and adding walls. It was made considering that my final animation was going to be in the style of a 1st person shooter, so I deliberately made it open plan.
Textures were added to the floor and walls in an attempt to represent a similar room sourced from the movie.
I added the "day of the dead" skull artwork and voodoo doll again to continue the santeria theme.
I re-created the table and chairs several times in order to try and achieve my platform for the base of my idea, I made candlesticks to provide another visual dynamic.
I imported all of my models into this space and began to plan my animation structure from within this environment.
Although possibly a little safe, it is quite a reasonable representation of the room taken from the movie, so I am quite pleased with it. I suppose given more time I could have incorporated more details to add, but I wanted to focus on the artwork, the candlesticks, table and chairs as I felt they were all important elements for my final idea.
Model 7:
Hands:
The hand was the hardest element to model. I attempted to model this item several times before I had any success at all. Though when I did finally achieve this result I felt that my confidence within the 3ds max platform grew.
In my earlier attempts I was using far too many segments, and my polygons were getting stretched. The model became far too complicated. I sat back, started it again from scratch, scaled it down to very few segments, and began to pull and drag the vertices. It just started to click.
I feel that this model really helped me understand the concept of modelling and improved my skills and patience levels immensely.
I made a copy of the original hand, and applied bends to the fingers in order to adapt the hand so that it would be able to hold the gun effectively.
Model 1:
Tarot Cards:


The cards were the first model I had ever created using the 3Ds max software.
Although, they are obviously quite a simple model to look back on now, they were very important in the development of my ideas. I feel for my first model they were a very good place to start.
The cards created an insight into texture and the potential of the medium early on. They were also an important vehicle in the theme of my design, helping to create the underlying mystique/ santeria element of my animation.
Technically quite simple, though this model provided a good platform to learn a couple of techniques early on; multi/sub object material texturing and the use of a chamfer box.
I'm very pleased with how this model turned out. They became a key element of my animation and work well aesthetically.
Model 2:
Walther PPK:


This was quite a challenging model for me to create. Given more time I would still do a lot to improve it.
I do like the smooth style of it, I deliberately attempted to try and keep that element of style while creating the model, somewhat emulating the style of the era and the Bond computer games that I grew up playing.
I spent a lot of time on this model, as initially I over complicated it. I assigned too many segments and had to edit it a lot to eliminate a lot of stretching.
I attempted to add texture to the handle, I just couldn't really get it to look right, when I applied texture it made didn't really work in context with the rest of the model, so eventually I made the decision to abandon the texture at this phase. Perhaps I will develop it further now I have more experience.
I do like how the model works visually, though I admit it could be improved with a little more detail in order to make it more realistic.
This model helped me learn the concept of modelling and allowed me to understand the concept of the space, so I'm quite grateful for that experience progression.
Model 3:
Snake:


A few techniques were attempted while trying to create the snake element. I really like the use of texture in this model and I think the materials selected are quite effective and realistic, especially the underbelly.
The snake became more of a "theme" item rather then a key object in the animation, I wanted to use it as it is a recurring element from the movie. Initially I had different ideas of how it could be incorporated more effectively, like sticking a knife through the snake on the table etc... Though in the final version I just allowed the snake to travel across the table.
Using bones in the snake was quite a difficult effect to achieve, it took a lot of edits to get it "nearly" right. I don't know if I was working with the bone technique entirely correctly but I persevered. The movement of the snake was changed a lot. It goes to show how difficult a potentially simple animation like the movement of a snake "slither" can be quite complex.
Again I suppose the final result is visually a little cartoon like, which could possibly be improved with further work?
Model 4:
Voodoo Doll:


The Voodoo doll was something that I wanted to create for again for the mystique/ santeria element of the animation.
I have always been interested in the concept of voodoo and it is a prominent theme throughtout the Live and Let Die movie, so I attempted to create that aura. Hopefully it helps for the final decoration and adds some detail to my room scene.
I really like this model, it is possibly my favourite. I compromised a bit of the detail that I would have liked to add, simply because it is a background item rather than a core model.
I think the buttons look great and the texture works quite effectively. I would have liked to have improved the detail in the threading, but could try that in the future.
It's a little bit of a shame that it has become merely decorative. It was a reasonably simple model to produce, again perhaps I have been a little reserved in my modelling, but it is a learning curve and I am quite happy with the success of this model.
I could have potentially made this model a little darker or scarier, maybe he looks a little too friendly. The pins could be made more realistic. I did work on the specular levels, but feel they still could be worked on a tiny more to become more authentic.
Model 5:
Knife:


The knife was the fastest model I made throught this module. It was literally made as a means to attach the doll to the wall. It was simple and served a purpose. I didn't want to spend too much time on it as it was not really going to be seen.
In retrospect I probably could have added more detail to it, though it wasn't necessary for this animation.
Model 6:
Room Scene:


The room scene was created from simply creating a large floor space and adding walls. It was made considering that my final animation was going to be in the style of a 1st person shooter, so I deliberately made it open plan.
Textures were added to the floor and walls in an attempt to represent a similar room sourced from the movie.
I added the "day of the dead" skull artwork and voodoo doll again to continue the santeria theme.
I re-created the table and chairs several times in order to try and achieve my platform for the base of my idea, I made candlesticks to provide another visual dynamic.
I imported all of my models into this space and began to plan my animation structure from within this environment.
Although possibly a little safe, it is quite a reasonable representation of the room taken from the movie, so I am quite pleased with it. I suppose given more time I could have incorporated more details to add, but I wanted to focus on the artwork, the candlesticks, table and chairs as I felt they were all important elements for my final idea.
Model 7:
Hands:


The hand was the hardest element to model. I attempted to model this item several times before I had any success at all. Though when I did finally achieve this result I felt that my confidence within the 3ds max platform grew.
In my earlier attempts I was using far too many segments, and my polygons were getting stretched. The model became far too complicated. I sat back, started it again from scratch, scaled it down to very few segments, and began to pull and drag the vertices. It just started to click.
I feel that this model really helped me understand the concept of modelling and improved my skills and patience levels immensely.
I made a copy of the original hand, and applied bends to the fingers in order to adapt the hand so that it would be able to hold the gun effectively.
SWOT Analysis
Strengths:
I feel that my ability to come up with creative ideas, has been a strength throught this module. My enthusiasm to learn has also proved to be a strength.
Working within 3D Max has given me a greater vision of what can be achieved as a production package on a larger scale. I genuinely feel that I have gained a greater appreciation for the 3d medium, this module has made me think a lot more about what can actually be achieved working with animation and has given me a wider respect for the volume of work and energy that is put into an animated movie or a computer game. A strength that I can take forward is that I feel confident in having learnt more about the realism of visual animation.
The positives I take with me from this module are that; intially I came up with some good creative ideas. I take a great deal of satisfaction in the fact that I have achieved a reasonable final animation effort that I can be proud of while learning and using a program that I had absolutely no experience in using to date.
It has been exciting embracing a new software in Autodesk 3Ds max. I am actually quite impressed with some of the models I created and on the whole I found the module very enjoyable, which if I am entirely honest at the beginning of the 12 weeks, I didn't expect.
Weaknesses:
Patience. My biggest ENEMY!!!!
At first when I began to come to terms with using the software and creating models, I got frustrated very easily. I found it very difficult to find the patience for the calm, controlled movements that are required for 3d modelling. This was hard to take at first, as others were excelling around me and I was struggling.
Perhaps I wasted a little time at the beginning of the module in respect to this. I was completely confused at first. I wish that I had learnt the skill quicker and more fluently from the outset. It took me a while to understand the concept of the 3d space and possibly my final results suffered a little as a result?
My idea was possibly a little unconventional in relation to others. My vision is a slightly different take on Bond, comparitively to the general explosion, action filled vehicle that is normally associated with 007. Maybe it wasn't the correct direction in terms of excitement.
Opportunities:
The basis of knowledge this module has given me is an excellent platform to build upon. I am very grateful for that.
My understanding of what can be achieved has completely opened my perception to what is possible working within the 3d medium.
I take from this module a feeling of confidence that I genuinely would be interested in extending my knowledge and application in this field. Which has actually come as quite a pleasant surprise to me.
Threats:
Here come the excuses!
I say that somewhat tongue in cheek, as it is not so much an excuse as a current unfortunate reality. Though I do feel I have had some challenging personal issues to deal with in the last year which have potentially not enabled me to commit the hours that I genuinely would have liked to aid me to be more proficient within the software and enbrace it a little more.
Paper Notes:

Thursday, 31 March 2011
More Animating - Snake
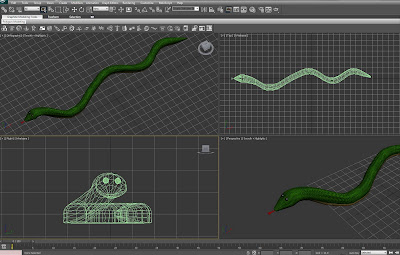
Snake - Bone Tool:
I began to try and manipulate my snake asset by attempting to animate a slither.
In order to achieve this movement I attempted to use the bone technique which can be applied from the systems menu in the create panel, and then selecting bones.
The Bone object is created in segments, by dragging and clicking until the required number of bones are met, then right click which stops the bones from creating more. I attemped to try and structure my bones as close to the shape of my snake as possible, this may have been better attempted by initially creating my snake asset in a straight line, though my model was actually curved during the production of it, which made it slightly more tricky to amend the bone structure to it, but hey, you live and learn. I have never attempted anything like this before, so it has been a good practice exercise.
One the required shape was satisfied the bone is attached to the snake, and the movement is manipulated by moving the parent bone "front" and also the children bones can be modified by movement, which helps to try and achieve the slither effect.
Snake with Bone Attached:
Basically once the Snake bone is assigned you can then further manipulate the animation, by setting the autokey and slowly modifying the movements, so for example I attempted to move the snake forward a little by pulling the front bone, then tried to adapt the "slither" by moving the other bones within the body by slight movements left and right - essentially trying to re-create a slither movement.
I need to work more on this, though a video of what I am attempting to describe can be found below:
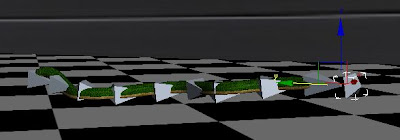
Snake moves across floor:
Snake moves across table:
I began to try and manipulate my snake asset by attempting to animate a slither.
In order to achieve this movement I attempted to use the bone technique which can be applied from the systems menu in the create panel, and then selecting bones.
The Bone object is created in segments, by dragging and clicking until the required number of bones are met, then right click which stops the bones from creating more. I attemped to try and structure my bones as close to the shape of my snake as possible, this may have been better attempted by initially creating my snake asset in a straight line, though my model was actually curved during the production of it, which made it slightly more tricky to amend the bone structure to it, but hey, you live and learn. I have never attempted anything like this before, so it has been a good practice exercise.
One the required shape was satisfied the bone is attached to the snake, and the movement is manipulated by moving the parent bone "front" and also the children bones can be modified by movement, which helps to try and achieve the slither effect.
Snake with Bone Attached:

Basically once the Snake bone is assigned you can then further manipulate the animation, by setting the autokey and slowly modifying the movements, so for example I attempted to move the snake forward a little by pulling the front bone, then tried to adapt the "slither" by moving the other bones within the body by slight movements left and right - essentially trying to re-create a slither movement.
I need to work more on this, though a video of what I am attempting to describe can be found below:
Snake moves across floor:
Snake moves across table:
Animation - Tutorial 10
Biped and Physique:
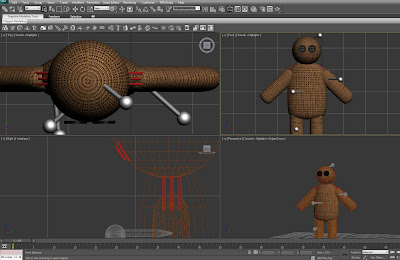
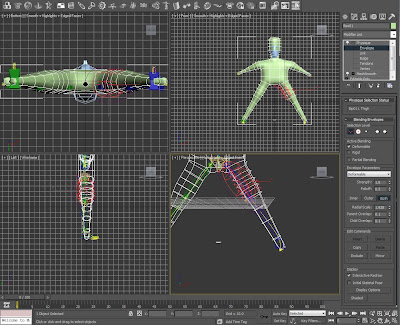
The purpose of today's tutorial was to implement the use of bipeds to help control character movement.
Firstly, a man was created (or downloaded), and then a biped was selected from the tool panel using the systems panel.
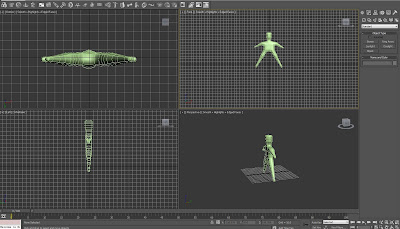
The idea is to manipulate the biped as close to the shape of the man you have created. It is moved inside of the "man" character using the figure mode and placed as effectively inside the mesh as possible.
The biped is adapted to try and place the bones as close to the shape of the character as possible, basically trying to emulate the proportions of the biped in relation to the character.
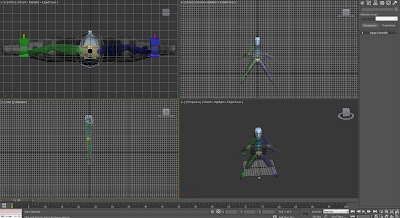
Deactivate figure mode and apply the physique setting in the modifier list, select "attach to node"and click on the pelvic bone on the biped which acts at the pivot point for the character.
In order to manipulate the biped as closely to the model for the parts of the biped that need to be animated, you need to select the individual parts of the biped that need to be controlled. In the physique modifier increase the radial scale which basically wraps the biped leg size into the characters trying to make them the same or slichtly bigger so that no stretching occurs when it comes to the movement.
An example of what this looks like below:
After you are happy that you have attached the biped correctly to your character and feel confident that the limbs will all move correctly then move to the motion panel with your biped selected and crete some footsteps for him to travel along using the footstep creation tool. Select the desired amount of footsteps required for your character and he should follow the pattern of steps.
Footsteps:
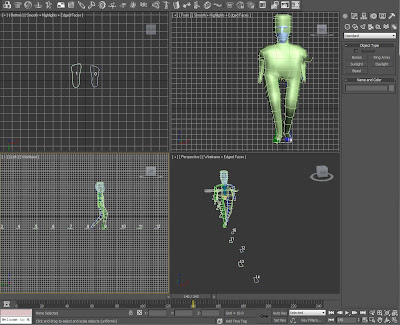
A Video of the Character Walking:
The purpose of today's tutorial was to implement the use of bipeds to help control character movement.
Firstly, a man was created (or downloaded), and then a biped was selected from the tool panel using the systems panel.

The idea is to manipulate the biped as close to the shape of the man you have created. It is moved inside of the "man" character using the figure mode and placed as effectively inside the mesh as possible.
The biped is adapted to try and place the bones as close to the shape of the character as possible, basically trying to emulate the proportions of the biped in relation to the character.

Deactivate figure mode and apply the physique setting in the modifier list, select "attach to node"and click on the pelvic bone on the biped which acts at the pivot point for the character.
In order to manipulate the biped as closely to the model for the parts of the biped that need to be animated, you need to select the individual parts of the biped that need to be controlled. In the physique modifier increase the radial scale which basically wraps the biped leg size into the characters trying to make them the same or slichtly bigger so that no stretching occurs when it comes to the movement.
An example of what this looks like below:

After you are happy that you have attached the biped correctly to your character and feel confident that the limbs will all move correctly then move to the motion panel with your biped selected and crete some footsteps for him to travel along using the footstep creation tool. Select the desired amount of footsteps required for your character and he should follow the pattern of steps.
Footsteps:

A Video of the Character Walking:
Monday, 28 March 2011
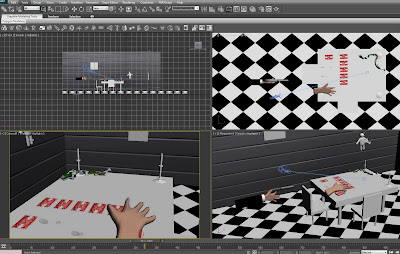
Creating a Room Scene...
Room:
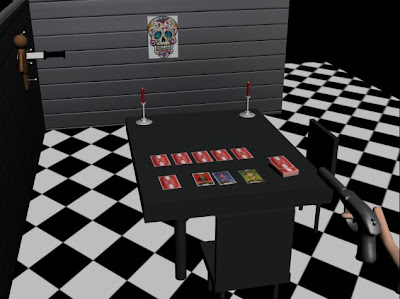
My final animation is going to feature mainly through the eyes of Solitaire, the fortune teller / tarot card reader from the Live and Let die movie.
I wanted to try and recreate a room in a similar theme to the room she sits in for her readings in the movie.
It is not the most aesthetically pleasing room, which is why I decided to add a few more details to my room, and I probably will create more as the scene progresses, but I wanted to post a "in progress" visualisation of my room so far.
The Room Image sourced from the movie is below:
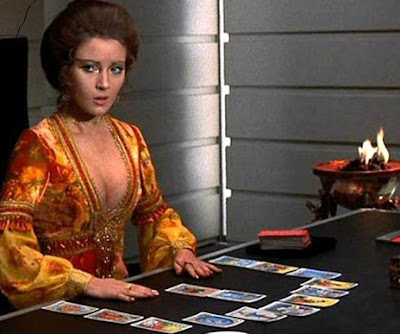
http://www.hedgedruid.com/wp-content/uploads/2010/09/janeseymour_solitaire.jpg
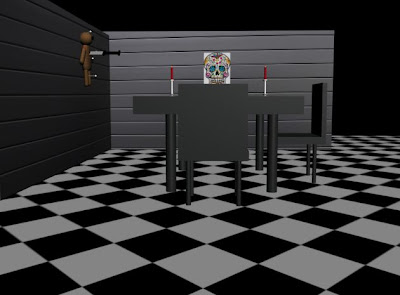
Basically the main considerations that I wanted to try and convey were a silver/metallic finish room, with a big black table where her cards are read from. I re-made my table from my earlier attempt, as initially the table I had made with my Tarot cards could have been made better from my inital prototype.
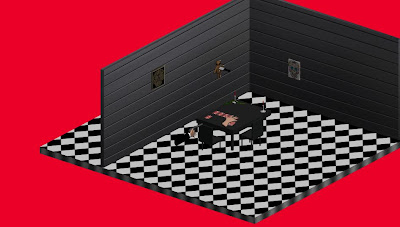
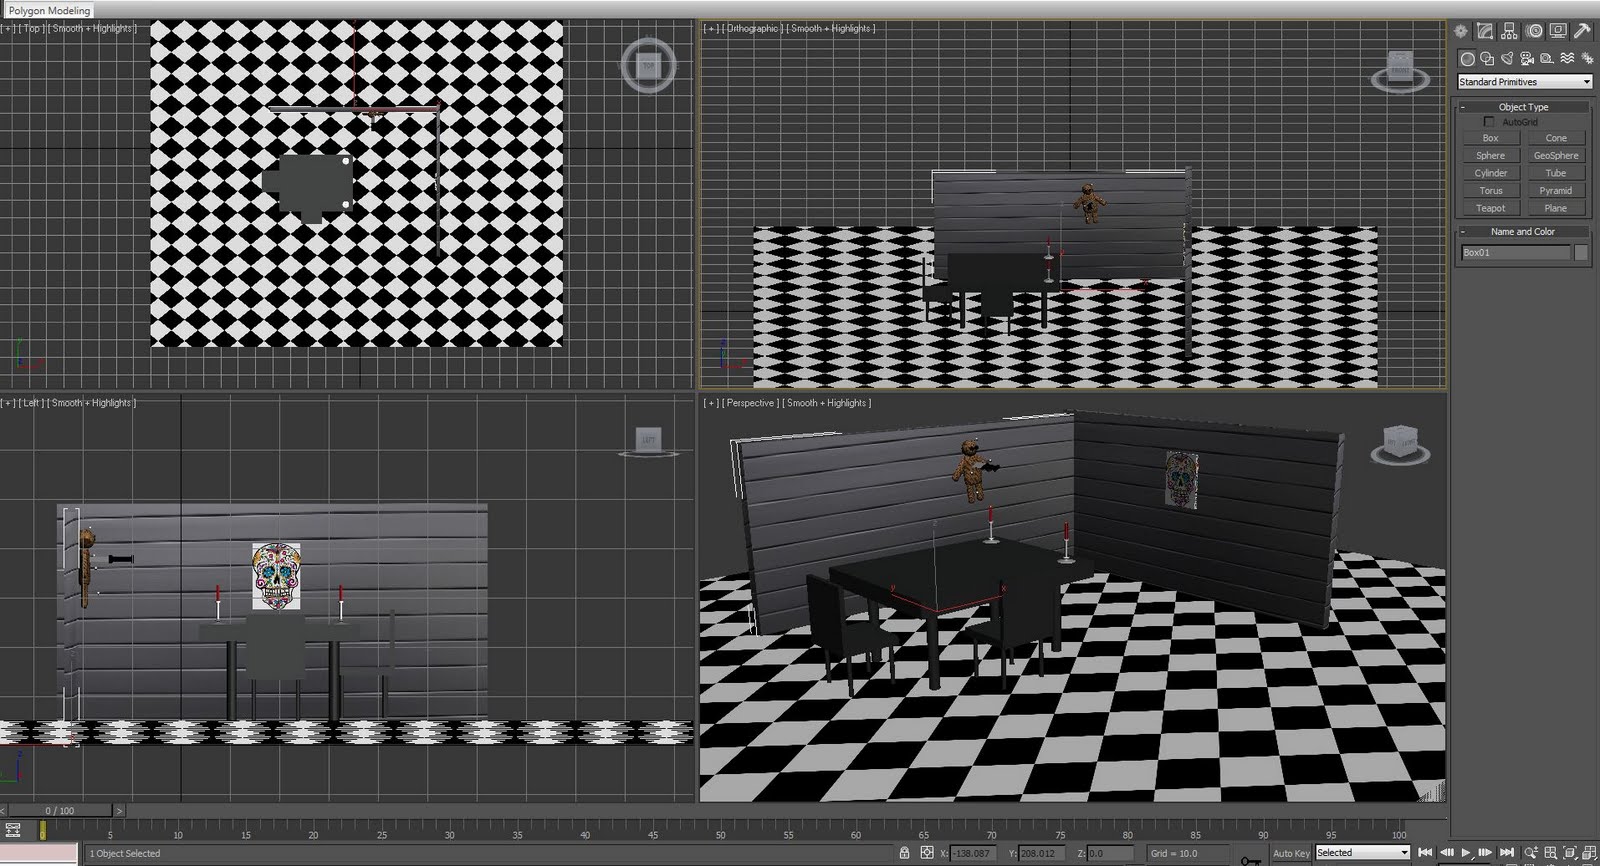
The room was created simply by creating to thin boxes for walls and applying a metallic texture which I lined up to try and create the indented effect on the walls provided in the image above, I simply created a chequered floor through the inbuilt effects in the material editor, and ramped the tiling right up to increase the floor tile effect.
I recreated the table and added some candlesticks, simply made out of some cylinders, to add some detail effect to the table. As I mentioned in my previous posts, I incorporated the voodoo theme by adding a voodoo doll and stabbing it to the wall. I also added a picture of a day of the dead skull, to add a bit more aesthetic detail to the scene. Again the day of the ded skull symbolising the day of death and keeping with the voodoo - death themes recurring throughout the movie.
I will probably add some more detail - though at this stage this is what my room is currently looking like:
Room Screenshot Overview:
(Here is the room with some selected items, tables, chairs, candlesticks, doll)
Render of Basic Room:
Above View:
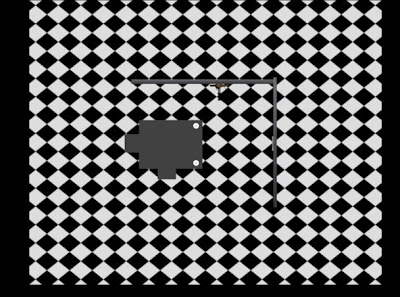
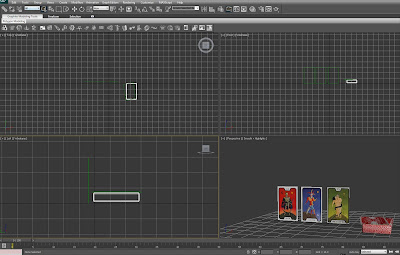
I then imported some more of my items into the room scene, my tarot cards, ppk and hand through the merge options in 3Ds and I also added a camera to begin to play around with movement and the logistics of how my idea could work.
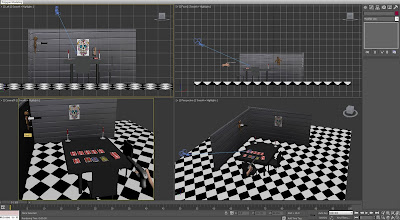
Screenshot with more Assets Imported:

Zoomed Room View Render Preview:
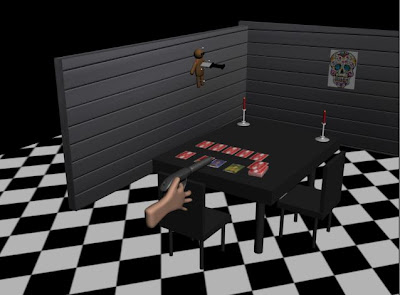
Camera Added:
Camera View Render: (FPS View)
My final animation is going to feature mainly through the eyes of Solitaire, the fortune teller / tarot card reader from the Live and Let die movie.
I wanted to try and recreate a room in a similar theme to the room she sits in for her readings in the movie.
It is not the most aesthetically pleasing room, which is why I decided to add a few more details to my room, and I probably will create more as the scene progresses, but I wanted to post a "in progress" visualisation of my room so far.
The Room Image sourced from the movie is below:

http://www.hedgedruid.com/wp-content/uploads/2010/09/janeseymour_solitaire.jpg
Basically the main considerations that I wanted to try and convey were a silver/metallic finish room, with a big black table where her cards are read from. I re-made my table from my earlier attempt, as initially the table I had made with my Tarot cards could have been made better from my inital prototype.
The room was created simply by creating to thin boxes for walls and applying a metallic texture which I lined up to try and create the indented effect on the walls provided in the image above, I simply created a chequered floor through the inbuilt effects in the material editor, and ramped the tiling right up to increase the floor tile effect.
I recreated the table and added some candlesticks, simply made out of some cylinders, to add some detail effect to the table. As I mentioned in my previous posts, I incorporated the voodoo theme by adding a voodoo doll and stabbing it to the wall. I also added a picture of a day of the dead skull, to add a bit more aesthetic detail to the scene. Again the day of the ded skull symbolising the day of death and keeping with the voodoo - death themes recurring throughout the movie.
I will probably add some more detail - though at this stage this is what my room is currently looking like:
Room Screenshot Overview:
(Here is the room with some selected items, tables, chairs, candlesticks, doll)
Render of Basic Room:

Above View:

I then imported some more of my items into the room scene, my tarot cards, ppk and hand through the merge options in 3Ds and I also added a camera to begin to play around with movement and the logistics of how my idea could work.
Screenshot with more Assets Imported:

Zoomed Room View Render Preview:

Camera Added:

Camera View Render: (FPS View)

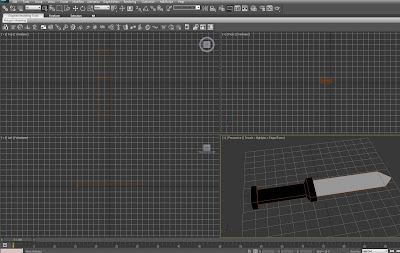
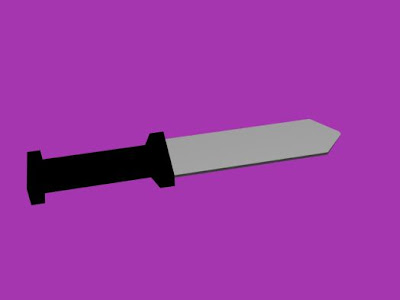
Knife
Knife:
Again, essentially an incidental item rather than an actual working model in my scene, though it is intended to add detail to my scene in an attempt to make my room look a little more interesting.
This is a simple model created from a box, where I selected the face of the box and used the inset technique to create a smaller thinner box within a box. I then extruded the thin box "blade" out from the knife handle and once happy with the length and scale of the objects extruded and scaled the end of the knife into a point to try and achieve a sharp point effect.
It was a very simple model to create and I just applied a silver and black colour to it to give it a bit more of a realistic feel.
I didn't want to get too caught up in the material of it, as I explained it is merely for room decoration.
Knife Screenshot:

Knife Render:

I came up with the idea of stabbing the voodoo doll to the wall using the knife to add something interesting to the room. This idea was inspired from Modern Warfare 2 (see below) where the mythical zombies teddy bear is stabbed to the wall in one of the bathrooms.

http://images.wikia.com/callofduty/images/8/8b/Teddy.jpg
Infinity Ward - Call of Duty - Modern Warfare 2 - Teddy Bear
While wandering around Call of Duty you can often find teddy bear's as a subliminal reference to their zombie games where the teddy bear is featured, again using this kind of subliminal symbolism I felt it could be an interesting way to incorporate into my animation, and encourage the voodoo theme in a different way.
My Voodoo Doll Stabbed Through the Wall:


Tutorial 8 - Havok's - Reactor
Further Animation Techniques - An Introduction to Havok's Reactor
Basically this is an alternative way to animate objects. 3Ds max has Havok's Reactor inbuilt that allows the user another way to animate objects.
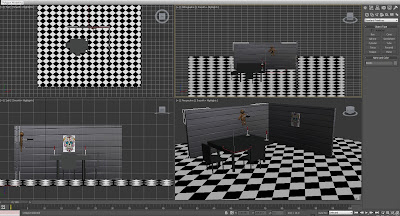
Here simply a shelf was made from a box and two spheres were added to the scene.
By selecting the rigid body collection in the Reactor control panel, then selecting the items that you wanted to animate (i.e. the spheres), then adding alternate masses to the objects, which determines the rate that the spheres drop and selecting the items as concave mesh, the end result is the objects falling down onto the shelf and rolling off all in one smooth animated move once the animation is applied.
Screenshot of Animation attempt:

Video of Animation:
Basically this is an alternative way to animate objects. 3Ds max has Havok's Reactor inbuilt that allows the user another way to animate objects.
Here simply a shelf was made from a box and two spheres were added to the scene.
By selecting the rigid body collection in the Reactor control panel, then selecting the items that you wanted to animate (i.e. the spheres), then adding alternate masses to the objects, which determines the rate that the spheres drop and selecting the items as concave mesh, the end result is the objects falling down onto the shelf and rolling off all in one smooth animated move once the animation is applied.
Screenshot of Animation attempt:

Video of Animation:
Voodoo Doll
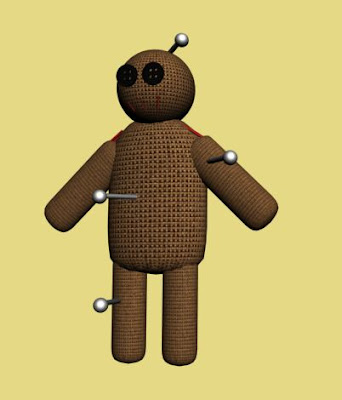
Voodoo Doll:
Voodoo is a prominent theme throughout Live and Let Die, so i wanted to try and incorporate this theme to my animation.
This object is essentially going to be an incidental part of my animation, probably more for decoration in my room scene, though I like the idea of adding subliminal elements to my animation and is something that I would enjoy exploring further given time..
Basically the voodoo doll is a very simple model. I created one sphere and five cylinders to create the doll and scaled them appropriately to give a good perspective and size of the doll.
I then added two more cylinders for the eyes and used the pro-boolean technique to create the button holes and applied a shiny texture to the buttons to try and create a more realistic effect.
I then added a thatched texture to try and give a doll/scarecrow feel to the object. I added small red cylinders to attempt to create the threading technique to the doll, in order to try and give the appearance of a "sewn" doll.
I created some needles which had been stabbed into the doll, again simply by creating a small sphere and cylinder then bevelling then ends of the cylinder into a point to give the sharp end of a needle feel, then simply grouped the item, and made clones of it to add more pins "stabbed into the doll".
I'm actually quite impressed with this model, even though it is probably a little insignificant for my actual scene, it provides a nice but of detail for my scene.
Voodoo Doll Screenshot:

Top View of Doll - Buttons and Pins:

Final Doll Perspective View:

Rendered Voodoo Doll:

Hand Asset
Hand:
Creating a hand proved quite difficult. I had to make about three different attempts at a hand before I was close to being happy with the object.
Initially my first design was far too complicated, I had put too many segments in and my polygons were getting stretched and lost inside each other. For my second attempt I tried to think more about how the hand would actually look and tried to extrude the fingers in segments so that the polygons would join more effectively at the bends in the fingers. Though again, the model wasnt looking right and was too blocky, again when the mesh smooth or turbosmooth teqnique was appliued to the object, it came out very lumpy and had had too many indents in it where the polygons had obviously got a little twisted within each other.
Second Hand Attempt:

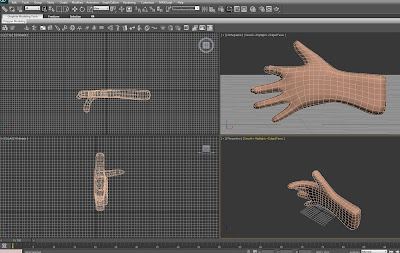
For my final attempt at the hand I imported a plane as an example to work to and started with a small box. I made it with very few segments, one along the top face and four through the main body of the shape so that i would be able to extrude four fingers from the shape.
Basically the model was made by extruding the fingers in segments to the joints in the fingers, which grabbing selected vertices to model the hand - trying to keep to the hand shape, pulling and manipulating the vertices to keep to the required shape of the hand, eventually the shape looked effective so i added a turbosmooth modifier to the object to smooth it out. A skin tone texture was added to try and give the appeal of skin.
Modelling 3rd Hand Attempt:

Full Hand Model:

(I made this model in much smaller easier to manage segments, and was able to extrude the fingers much more effectively in doing so, I feel that I kept to the shape of the hand really well and this was a much improved model from my earlier efforts.)
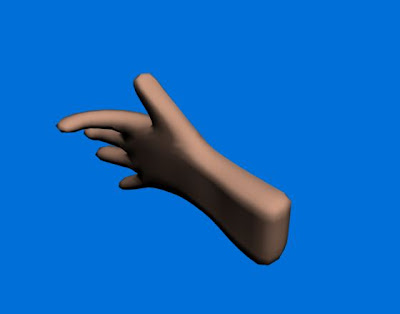
Final Hand with Turbosmooth and Skin Texture Applied:

I still need to add more detail to the hand, but at this stage I am pleased that I now have this asset to work with for my animation. I will aim to concentrate on the further detail once I have progressed a little further with my final piece.
Creating a hand proved quite difficult. I had to make about three different attempts at a hand before I was close to being happy with the object.
Initially my first design was far too complicated, I had put too many segments in and my polygons were getting stretched and lost inside each other. For my second attempt I tried to think more about how the hand would actually look and tried to extrude the fingers in segments so that the polygons would join more effectively at the bends in the fingers. Though again, the model wasnt looking right and was too blocky, again when the mesh smooth or turbosmooth teqnique was appliued to the object, it came out very lumpy and had had too many indents in it where the polygons had obviously got a little twisted within each other.
Second Hand Attempt:

For my final attempt at the hand I imported a plane as an example to work to and started with a small box. I made it with very few segments, one along the top face and four through the main body of the shape so that i would be able to extrude four fingers from the shape.
Basically the model was made by extruding the fingers in segments to the joints in the fingers, which grabbing selected vertices to model the hand - trying to keep to the hand shape, pulling and manipulating the vertices to keep to the required shape of the hand, eventually the shape looked effective so i added a turbosmooth modifier to the object to smooth it out. A skin tone texture was added to try and give the appeal of skin.
Modelling 3rd Hand Attempt:

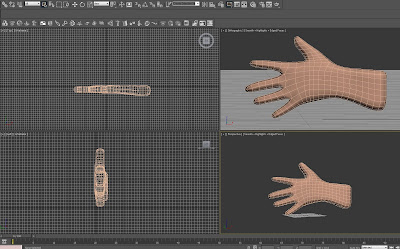
Full Hand Model:

(I made this model in much smaller easier to manage segments, and was able to extrude the fingers much more effectively in doing so, I feel that I kept to the shape of the hand really well and this was a much improved model from my earlier efforts.)
Final Hand with Turbosmooth and Skin Texture Applied:

I still need to add more detail to the hand, but at this stage I am pleased that I now have this asset to work with for my animation. I will aim to concentrate on the further detail once I have progressed a little further with my final piece.
Tutorial 7 - Animation Techniques
Path Constraint:

Video showing technique:
The next technique was to take the movement a step further by creating a propellor style object (by adding 4 thin boxes to a sphere in a cross shape) which was set to rotate while the autokey was turned on.
In the rendering set-up options, In the "Renderer" Tab the option was selected to add a motion blur to the animation in the object properties. Motion Blur was selected and the multiplier was increased which determines the rate at which the object spins.

Videos of these techniques:
Propeller Spin:
Motion Blur Test:
The Path Constraint is a very simple and easy to achieve first animation attempt.
It is a simple movement technique easily created with a number of small steps.
A circle is created in the viewport which will act as the path for the animated object to travel along. The object created is a small sphere, simply made from the standard primitives toolkit.
Once the sphere is selected, the Animation Tab is selected and within the Constraints sub-menu, PATH CONSTRAINTS.
Once this technique is applied is small dotted circle appears in the viewport, when you click on the circle the created sphere will jump to the dotted circle, this assigns the object to the path that the object will travel along.
Selecting Play Animation will now allow the sphere to travel along the circular path created and move around in a circle.

Video showing technique:
The next technique was to take the movement a step further by creating a propellor style object (by adding 4 thin boxes to a sphere in a cross shape) which was set to rotate while the autokey was turned on.
In the rendering set-up options, In the "Renderer" Tab the option was selected to add a motion blur to the animation in the object properties. Motion Blur was selected and the multiplier was increased which determines the rate at which the object spins.

Videos of these techniques:
Propeller Spin:
Motion Blur Test:
Wednesday, 2 March 2011

Tarot Symbolism
THE FOOL:

Meaning:
The beginning of a cycle or an adventure; a risk must be taken.
Description:
The Fool represents the child in us. He stands for spontaneous new beginnings and an open-mindedness free of prejudice. He is the symbol of playful lightheartedness, full of the joy of living, and free from care. The Fool shows us that we can enter a new area of life with wonder and without great expectations, and often without previous experience. He therefore can represent a childlike innocence, the result of which can be recklessness, foolish naivete, playfulness, as well as tomfoolery. The Fool can symbolize the simplicity of a wise and humble insight that we achieve at the end of a long and often tiring search. The Fool can also stand for the joker and the rascal in the traditional sense as well as the one and only honest adviser at the court as the alter ego of the king. In any case, he lives totally in the present, is the symbol of openness and spontaneous honesty, always ready for new experiences. Whether this stance is the result of our refusal to grow up or of the wise realization of our spiritual maturity cannot be decided by the card. The Fool always indicates refreshing experiences that sometimes may have chaotic traits but do not represent true danger, even when we fall flat on our faces.
THE LOVERS:

Meaning:
A relationship or love affair with a trial or choice involved.
Description:
This card combines two topics. It indicates a great experience in love, yet also presents us with the perception that this step is connected with a necessary decision: the renunciation of the previous framework of life (the parental home, the bachelor existence, the many flirtations) and the clear avowal of one love. Only this step will lead to the overwhelming experience shown by the Lovers. This card therefore used to be called "The Decision." It can also indicate necessary decisions that have little or nothing to do with love. In such cases, it means that we must decide with our whole heart, without rancor, and without keeping an escape route open. Which of the two themes this card emphasizes can only be determined according to the background of the question asked. In any case, it means the great unconditional "yes."
DEATH:

Meaning:
Changes: the end of the old and the birth of the new.
Description:
Death means parting, the great letting go, the end. It then also prepares the way for the new, for that which is to come. However, the card itself first presents us with the end. This can be positive when it relates to a long wished for, liberating ending, yet it is also natural that we have our most painful experiences with the theme of this card. In contrast to the 10 of Swords, which indicates the random and thereby premature ending, this card always stands for the natural end. This means that it is time to let go of something. The Death card is unjustly one of the most feared. The eternal embellishers, who do not understand it, read the card only to be the proclamation of something new and want to deny us the deep experience of parting and the related life-accepting experiences. "We have separated living from dying and the interval between them is fear" says Krishnamurti, and: "You cannot live without dying."
Reference: http://www.mysticgames.com/mysticgames_cfmfiles/tarotinfo/majorarcana.cfm?DeckID=2&Arcana=major

Meaning:
The beginning of a cycle or an adventure; a risk must be taken.
Description:
The Fool represents the child in us. He stands for spontaneous new beginnings and an open-mindedness free of prejudice. He is the symbol of playful lightheartedness, full of the joy of living, and free from care. The Fool shows us that we can enter a new area of life with wonder and without great expectations, and often without previous experience. He therefore can represent a childlike innocence, the result of which can be recklessness, foolish naivete, playfulness, as well as tomfoolery. The Fool can symbolize the simplicity of a wise and humble insight that we achieve at the end of a long and often tiring search. The Fool can also stand for the joker and the rascal in the traditional sense as well as the one and only honest adviser at the court as the alter ego of the king. In any case, he lives totally in the present, is the symbol of openness and spontaneous honesty, always ready for new experiences. Whether this stance is the result of our refusal to grow up or of the wise realization of our spiritual maturity cannot be decided by the card. The Fool always indicates refreshing experiences that sometimes may have chaotic traits but do not represent true danger, even when we fall flat on our faces.
THE LOVERS:

Meaning:
A relationship or love affair with a trial or choice involved.
Description:
This card combines two topics. It indicates a great experience in love, yet also presents us with the perception that this step is connected with a necessary decision: the renunciation of the previous framework of life (the parental home, the bachelor existence, the many flirtations) and the clear avowal of one love. Only this step will lead to the overwhelming experience shown by the Lovers. This card therefore used to be called "The Decision." It can also indicate necessary decisions that have little or nothing to do with love. In such cases, it means that we must decide with our whole heart, without rancor, and without keeping an escape route open. Which of the two themes this card emphasizes can only be determined according to the background of the question asked. In any case, it means the great unconditional "yes."
DEATH:

Meaning:
Changes: the end of the old and the birth of the new.
Description:
Death means parting, the great letting go, the end. It then also prepares the way for the new, for that which is to come. However, the card itself first presents us with the end. This can be positive when it relates to a long wished for, liberating ending, yet it is also natural that we have our most painful experiences with the theme of this card. In contrast to the 10 of Swords, which indicates the random and thereby premature ending, this card always stands for the natural end. This means that it is time to let go of something. The Death card is unjustly one of the most feared. The eternal embellishers, who do not understand it, read the card only to be the proclamation of something new and want to deny us the deep experience of parting and the related life-accepting experiences. "We have separated living from dying and the interval between them is fear" says Krishnamurti, and: "You cannot live without dying."
Reference: http://www.mysticgames.com/mysticgames_cfmfiles/tarotinfo/majorarcana.cfm?DeckID=2&Arcana=major
Subscribe to:
Posts (Atom)